

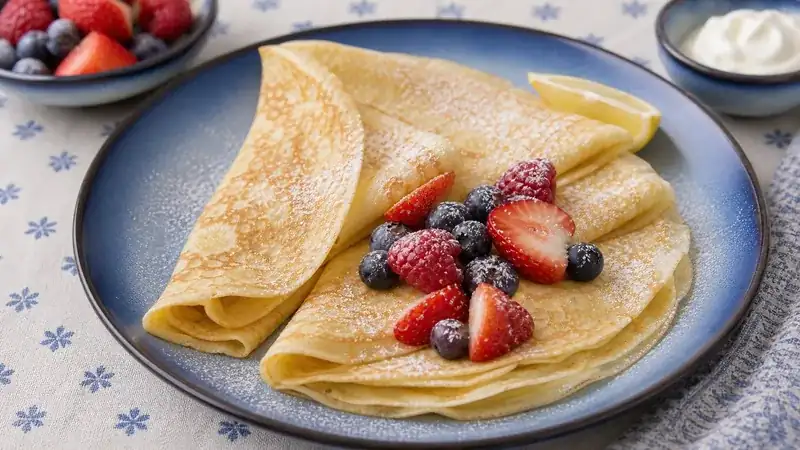
Crepes
Whisk together flour, eggs, milk, butter, and a pinch of salt into a thin batter, then rest it for 30 minutes. Cook in a lightly buttered nonstick pan over medium heat, about 1-2 minutes per side, until just golden at the edges.
Crepes have an undeserved reputation for being the kind of breakfast you need French grandparents, a copper pan, and emotional stability to pull off. In reality, the batter is flour, eggs, milk, water, butter, and salt, and the hardest part is learning the wrist motion that spreads about a quarter cup of batter into a thin circle before it sets. The first one may look like a map of a country that does not exist. That is normal.
The part you cannot rush is the rest. Give the batter at least 30 minutes in the refrigerator so the flour fully hydrates and the gluten relaxes; that is what keeps the finished crepes tender instead of rubbery. A medium-hot nonstick skillet works better than screaming heat, and the second side only needs a brief turn in the pan. Stack the finished crepes as you cook — they will stay soft and flexible.
Add sugar and vanilla for sweet crepes, leave them out for savory fillings, and treat the first crepe as calibration. Every pan demands a small offering. Eating the evidence over the stove is simply responsible quality control.
Ingredients
- 1 cup (125g) all-purpose flour
- 2 large eggs
- 1 cup (240ml) whole milk
- 1/2 cup (120ml) water
- 2 tablespoons unsalted butter, melted, plus more for the pan
- 1/4 teaspoon salt
- 1 tablespoon granulated sugar (optional, for sweet crepes)
- 1 teaspoon vanilla extract (optional, for sweet crepes)
Instructions
- 1Combine the flour and salt in a large bowl (or blender). Add the eggs and whisk to form a thick paste — this prevents lumps from forming when you add the liquids.
- 2Gradually whisk in the milk, then the water, until the batter is completely smooth and the consistency of heavy cream. Whisk in the melted butter. If using, add sugar and vanilla.
- 3Pour the batter through a fine mesh strainer into a bowl or large measuring cup to catch any remaining lumps. Cover with plastic wrap and refrigerate for at least 30 minutes, or up to 24 hours. This step is mandatory — it relaxes the gluten and produces tender crepes.
- 4When ready to cook, heat a 9 or 10-inch nonstick skillet or crepe pan over medium heat. Brush lightly with melted butter — you barely need any. The pan is ready when a drop of water evaporates immediately on contact.
- 5Pour about 1/4 cup (60ml) of batter into the center of the pan. Immediately lift the pan and swirl it in a circular motion to spread the batter into a thin, even round about 8 inches in diameter. Work quickly — the batter sets fast.
- 6Cook the first side for 1 to 2 minutes, until the edges look dry and lightly golden and the surface appears set. The underside should be pale gold with light brown spots.
- 7Slide a thin spatula under the crepe and flip. Cook the second side for 30 to 45 seconds only. The second side will look spottier and less uniform — that's normal, and that's the inside.
- 8Slide the finished crepe onto a plate. Repeat with the remaining batter, stacking crepes directly on top of each other. They will not stick together. Butter the pan every 2 to 3 crepes as needed.
- 9Note: The first crepe almost always looks wrong. Treat it as a test crepe to calibrate your heat. Eat it standing over the stove. That's what it's for.
Nutrition Information
Estimated per serving: 1 crepe (recipe makes 12).
Estimated from the ingredients and quantities in this recipe using standard food-composition values. Brand choices, trimming, cooking loss, optional ingredients, and actual portion size can change the numbers. How we calculate nutrition estimates.
Pro Tips
- Rest the batter. Thirty minutes minimum. One hour is better. This isn't me being fussy — the gluten literally needs to relax or your crepes will be rubbery and pull back in the pan like they're reconsidering the whole situation.
- Your heat is probably too high. Medium heat. If the batter is setting before you finish swirling, turn it down. You're making crepes, not searing a steak.
- The first crepe is always a sacrifice. Accept this. The pan needs to calibrate, you need to practice the swirl, and the cooking gods require a tribute. Eat it over the sink with some powdered sugar and let it go.
Substitutions
Storage Instructions
Stack cooled crepes with a sheet of parchment or wax paper between each one (or don't — they genuinely don't stick). Wrap the stack in plastic wrap or store in a zip-top bag. Refrigerate for up to 3 days. Freeze for up to 2 months; thaw overnight in the refrigerator or at room temperature for 30 minutes.
Make Ahead
The batter can be made up to 24 hours ahead and stored, covered, in the refrigerator. Stir gently before using. Finished crepes can also be made a day ahead, stacked, wrapped, and refrigerated — reheat briefly in a dry skillet over low heat for 20 seconds per side, or microwave the stack covered with a damp paper towel for 30-45 seconds.
Frequently Asked Questions
Can I make this ahead of time?
Yes. The batter can be made up to 24 hours ahead and stored, covered, in the refrigerator. Stir gently before using. Finished crepes can also be made a day ahead, stacked, wrapped, and refrigerated — reheat briefly in a dry skillet over low heat for 20 seconds per side, or microwave the stack covered with a damp paper towel for 30-45 seconds.
How do I store the leftovers?
Stack cooled crepes with a sheet of parchment or wax paper between each one (or don't — they genuinely don't stick). Wrap the stack in plastic wrap or store in a zip-top bag. Refrigerate for up to 3 days. Freeze for up to 2 months; thaw overnight in the refrigerator or at room temperature for 30 minutes.
Can I freeze it?
Yes. See the storage section on this page for exact freezing and thawing directions — most versions of Crepes Recipe freeze well for up to 2–3 months when cooled fully first and portioned into airtight containers.
Can I adjust it for what I have on hand?
Yes. Tested adjustments on this recipe include whole milk → 2% milk or oat milk; all-purpose flour → 1-to-1 gluten-free flour blend; and whole milk + water → 1.5 cups whole milk.
What's the most common mistake to avoid?
Rest the batter. Thirty minutes minimum. One hour is better. This isn't me being fussy — the gluten literally needs to relax or your crepes will be rubbery and pull back in the pan like they're reconsidering the whole situation.
More Like This



You Might Also Like



Finish With Dessert
Try this next
Southern Pecan Pie
View recipe →