
Chocolate Lava Cakes for Two
Valentine's Day lava cakes are made by melting chocolate and butter together, whisking in eggs and sugar, folding in flour, then baking in greased ramekins at 425°F for exactly 12 minutes. The centers stay molten if you pull them at the right time and serve immediately.
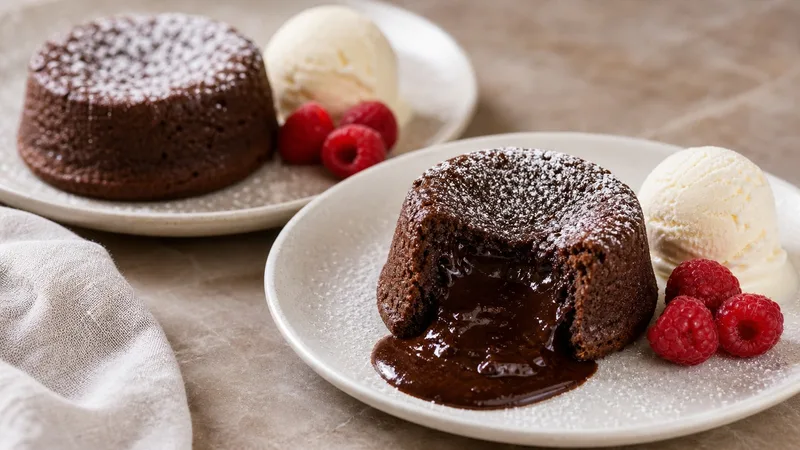
Chocolate lava cake is a timing trick disguised as a fancy dessert. The outside needs to set like cake while the center stays fluid, which is why a hot 425°F oven and a narrow 11–13 minute baking window matter more than any dramatic restaurant presentation.
Butter and cocoa the ramekins thoroughly, melt good semisweet or bittersweet chocolate with butter, and let it cool slightly before it meets the eggs. Extra yolks make the batter rich, while only a small amount of flour gives the edges enough structure to hold the molten center. The tops should look matte and the edges set, but the middle should still wobble gently when the ramekins come out.
Rest them for one minute—one—and invert confidently. Powdered sugar, raspberries, or vanilla ice cream are all good ideas, but the first spoonful cutting into the center is the whole production. If one cake sticks, eat it from the ramekin and call it deconstructed. Romance has survived worse branding.
Ingredients
- 4 oz (113g) semi-sweet or bittersweet chocolate, roughly chopped (60-70% cacao recommended)
- 4 tablespoons (56g) unsalted butter, cut into pieces, plus more for greasing
- 2 large eggs
- 2 large egg yolks
- 1/4 cup (50g) granulated sugar
- 1/4 teaspoon fine sea salt
- 1/2 teaspoon pure vanilla extract
- 3 tablespoons (24g) all-purpose flour
- 2 teaspoons unsweetened cocoa powder, for dusting ramekins
- Powdered sugar, fresh raspberries, or vanilla ice cream for serving
Instructions
- 1Preheat your oven to 425°F (220°C). Position a rack in the center of the oven. This temperature is not negotiable — lower and the center sets, higher and the outside overcooks before the center gets going.
- 2Generously butter two 6-oz ramekins. Dust each one with cocoa powder, tapping out any excess. This step is load-bearing. A poorly greased ramekin is how you end up with a crater cake you have to eat with a spoon directly out of the dish, which, again, is also fine, but not the plan.
- 3Combine the chopped chocolate and butter in a heatproof bowl set over a saucepan of barely simmering water (double boiler method). Stir occasionally until completely melted and smooth. Remove from heat and let cool for 3-4 minutes. Alternatively, microwave in 30-second intervals, stirring between each, until melted.
- 4In a medium bowl, whisk together the eggs, egg yolks, granulated sugar, salt, and vanilla extract until the mixture is slightly thickened and pale, about 1-2 minutes of active whisking.
- 5Pour the cooled chocolate mixture into the egg mixture and whisk to combine. The chocolate should be warm but not hot — if it's too hot it will scramble the eggs, and that is a grief I want you to avoid.
- 6Add the flour and fold gently with a spatula until just incorporated. Do not overmix. A few small streaks are fine. Overmixing develops gluten and makes the cakes tough rather than tender.
- 7Divide the batter evenly between the two prepared ramekins. At this point, you can refrigerate them for up to 24 hours (see make-ahead note) or bake immediately.
- 8Place the ramekins on a small baking sheet and bake at 425°F for 11-13 minutes. The edges should be set and pulling slightly away from the sides, and the top should look matte (not glossy or wet), but the center should still have a gentle wobble when you nudge the pan. 12 minutes is the sweet spot in most standard ovens.
- 9Remove from the oven and let rest in the ramekins for exactly 1 minute — no longer, or the centers will continue cooking. Run a thin knife or offset spatula around the inside edge of each ramekin.
- 10Place a dessert plate face-down over each ramekin, then flip both together in one confident motion. Hold for 10 seconds, then lift the ramekin. Serve immediately with powdered sugar, fresh raspberries, or a scoop of vanilla ice cream.
Nutrition Information
Estimated per serving: 1 of 2 servings.
Estimated from the ingredients and quantities in this recipe using standard food-composition values. Brand choices, trimming, cooking loss, optional ingredients, and actual portion size can change the numbers. How we calculate nutrition estimates.
Pro Tips
- Buy a timer and use it. Not the one on your phone that you'll ignore, an actual countdown you set and stand next to. One extra minute in the oven is the difference between a lava cake and a very expensive brownie.
- The egg yolks are not optional. They're what makes the texture rich and the center liquid-adjacent rather than just undercooked. Two whole eggs and two extra yolks is the ratio that works — I have tried variations and this is the one.
- If you're not confident about your oven's accuracy, bake a test ramekin with a tablespoon of plain water in it at 425°F for five minutes first. If it's boiling aggressively at four minutes, your oven runs hot. Adjust by 25 degrees or take one minute off your bake time. That's not a recipe tip, that's a survival strategy.
Substitutions
Storage Instructions
Lava cakes are best eaten the moment they come out of the ramekin. Leftovers can be stored covered in the refrigerator for up to 2 days, but the center will be fully set after refrigeration — they become dense individual chocolate cakes, which is still good. Reheat uncovered in a 350°F oven for 8-10 minutes or microwave for 30-45 seconds. Do not expect a molten center on reheated cakes.
Make Ahead
Prepare the batter through step 7, fill the greased and dusted ramekins, cover tightly with plastic wrap, and refrigerate for up to 24 hours. When ready to bake, remove from the refrigerator 15-20 minutes before baking to take the chill off, then bake at 425°F for 13-14 minutes (one to two minutes longer than fresh batter to account for the residual cold).
Freezing
Yes. Cool Chocolate Lava Cakes for Two completely before wrapping it tightly for the freezer. Freeze individual portions when practical; thaw while still wrapped so condensation forms on the wrapping rather than directly on the crumb.
Frequently Asked Questions
Can I make this ahead of time?
Prepare the batter through step 7, fill the greased and dusted ramekins, cover tightly with plastic wrap, and refrigerate for up to 24 hours. When ready to bake, remove from the refrigerator 15-20 minutes before baking to take the chill off, then bake at 425°F for 13-14 minutes (one to two minutes longer than fresh batter to account for the residual cold).
How do I store the leftovers?
Lava cakes are best eaten the moment they come out of the ramekin. Leftovers can be stored covered in the refrigerator for up to 2 days, but the center will be fully set after refrigeration — they become dense individual chocolate cakes, which is still good. Reheat uncovered in a 350°F oven for 8-10 minutes or microwave for 30-45 seconds. Do not expect a molten center on reheated cakes.
Can I freeze it?
Yes. Cool Chocolate Lava Cakes for Two completely before wrapping it tightly for the freezer. Freeze individual portions when practical; thaw while still wrapped so condensation forms on the wrapping rather than directly on the crumb.
Can I adjust it for what I have on hand?
Yes. Tested adjustments on this recipe include semi-sweet chocolate → milk chocolate; unsalted butter → salted butter; and all-purpose flour → gluten-free 1-to-1 flour blend.
What's the most common mistake to avoid?
Buy a timer and use it. Not the one on your phone that you'll ignore, an actual countdown you set and stand next to. One extra minute in the oven is the difference between a lava cake and a very expensive brownie.
How long does it take?
About 27 minutes from start to finish — including 12 minutes of active cooking.